On a miserable day in February, I suddenly had a deep and burning desire to find out what's so hot about this thing called "overshot."

If you need a more in-depth explanation of how to weave it, I suggest Deborah Chandler's Learn to Weave book, or plenty of online resources available with a quick search. But for the sake of anyone who needs it, here's the simplified layman's explanation—a conceptual explanation—that I'd have liked to hear when I first asked about it years ago:


Wrapping up


I'd known the word 'overshot' for a long time, but an unfortunate conversation as a budding weaver had set me on the wrong track about it. I was speaking to an older, experienced weaver at a meeting of the local spinning guild. I was a stranger there and didn't know anyone, but I was uncharacteristically outgoing that day. As a relative newcomer to the fascinating world of fiber, I was enthusiastic about learning as much as I could from anyone who was willing to tell me things. So at one point I found myself in a conversation that went something like this:
WEAVER: "So I was working on an overshot piece..."
ME: "Now, what exactly is overshot? I've heard the term, but I'm not sure how it works. Could you explain?"
WEAVER: "It's just normal weaving. Like, regular weaving."
* awkward pause *
ME: "Oh."
The way I remember it, the weaver delivered her dismissive non-answer with an accusatory glare that traveled all the way down the length of her nose and straight into my quivering soul. The glare was probably all in my imagination...or perhaps not. Needless to say, I didn't learn much about overshot that day, and I haven't revisited that guild since. For years, I was actually under the impression that overshot was just another term for plainweave (over-under-over-under). You know, "normal" weaving. Eventually, my research on the internet rectified this misconception, and today that conversation is just an eyeroll-inducing memory. I will say, though, that I did actually learn something valuable that day. I learned that no concept is too simple to explain, because somebody out there needs to hear the basics. Sometimes it may come off as condescending to over-explain things, but it's easy to ask someone to skip ahead to the good stuff. It's not always so easy to ask for them to back up a few steps, especially when you don't know what you need to know.
So, what is overshot?
Overshot is a technique for weaving big, showy patterns that you normally couldn't get away with on a simple loom. The way the pattern looks, you'd think the floats of warp and weft would be too big and the fabric would just fall apart. You get around this in overshot by using two shuttles, which you alternate between every other row. It's like the two shuttles don't know the other one exists. The first shuttle carries the same thread that you used for the warp, and you use it every other row to weave "normal" plainweave, going over-under-over-under and so on. The other shuttle carries the showier yarn in a contrasting color, and you use this yarn to create the stand-out pattern. In a sense, you "shoot" the pattern yarn "over" a background of plainweave (hence overshot). Since you're working over a structurally-sound plainweave background, you can skip over as many threads as you want with the pattern yarn and the resulting fabric will stay secure.
It's also crucial to know that the plainweave weft rows are usually left out of written patterns. You just need to know to include a pick of tabby between every pattern row in the draft you're using.

Weaving the Periwinkle Draft
Once I'd figured out what exactly overshot was, it was time to select a pattern to try out. This mostly involved a lot of image searches and poring over pretty pictures. Eventually, I settled on a miniature pattern called 'Periwinkle' as my first foray into overshot. When you think of overshot, you usually picture sweeping geometric patterns over giant coverlets, but you can use the same concept on a small scale as well. I thought Periwinkle was attractive, but I was also attracted by the relatively small 24-thread pattern repeat that I'd have to thread the loom with. It was a good, modest starting point.
But then I ran into a problem: I couldn't find the draft.
I found a fair number of people's projects where they made reference to using a pattern created by Josephine Estes called "Periwinkle," and it was easy enough to find a picture of the threading. But no matter how hard I looked, I couldn't find any more than that to go on.

Therefore it was up to me to back-engineer the tie ups and treadling instructions by looking closely at the pictures. And so I did. I worked out my original plans on graph paper, which I've digitized (below) for posterity. As is customary for overshot patterns, the plainweave rows are omitted from the treadling instructions. It is understood that a row of tabby (a.k.a. plainweave) is to be woven between each of the rows in the chart, which only shows which treadles to use for the pattern weft.

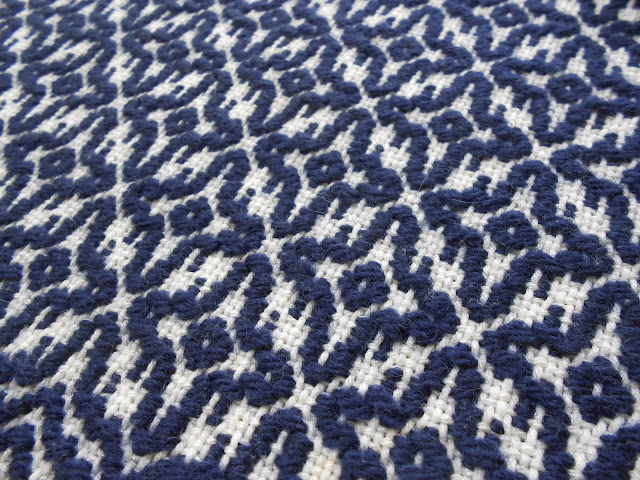
Below is a sample of what this draft will produce on a counterbalance loom, with 6 pattern repeats. It is a relatively coarse upholstery fabric: 8/4 cotton rug warp at 12 EPI/PPI is used for the warp and the tabby weft, and the pattern weft is worsted-weight wool yarn from my knitting stash.

By raising & lowering the opposite shafts, you get the exact reverse pattern. The draft and a sample of this are shown below. It also happens to be identical to the reverse side of the sample shown up above. Simply flipping it over after it's off the loom would give you the same result as the following pattern:


Ironically, after I finished figuring out the drafts above I did actually manage to find both Volume I and Volume II of Josephine Estes' Miniature Overshot monographs online, through an On-Line Digital Archive of Documents on Weaving and Related Topics. Periwinkle is on page 12 of the second volume. The problem is that all of these links seem to be broken or timed-out very frequently, hence my initial difficulty finding the pattern. As I write this, the links didn't work for me an hour ago, but now they do. My best advice is to be patient and try again later, if you have trouble accessing these great resources.
As it turns out, I didn't actually mind having done all that extra work. For one thing, I understood what was going on much better, since I'd figured it out myself. But more than that, my work wasn't exactly wasted. While totally usable, Josephine Estes does not present her drafts in the typical modern way. She leaves out the tie-ups in favor of simply listing the sequence of shaft combinations to lower. Although it would have been nice to use her numbers, I still would have re-written the draft for my own purposes.
Adapting for 'Rising-Shed' vs. 'Falling-Shed' Looms
Now the truth is, what I've described in the previous section above is correct, but it's not what I actually did. And that's because I didn't stop to think through the implications of using a jack loom instead of a counterbalance loom before I got started.
Basically
a counterbalance loom LOWERS the shafts that your treadle is connected
to, whereas a jack loom RAISES those shafts. Which means, in practical
terms, that if you use the same tie-ups and treadling pattern on both kinds of looms, you will produce exact opposites. It's no problem,
because all you need to do is flip your work over once it's off the loom, and
the back becomes the front. The only practical difference is which side you're looking at while you weave. Since I was, in fact, using a Harrisville jack loom to weave my samples, I actually made the second sample using the first draft, and vice versa. This is one advantage of how Josephine Estes writes her patterns: she clearly says to LOWER the shafts that she lists, so as to avoid confusion. I simply failed to notice her helpful instructions.
It's an easy-enough mistake to make, and it's quite nice that it doesn't ultimately matter. The result ends up being the same.
By the way, the terms "rising shed" (referring to a jack loom) and "falling shed" (referring to a counterbalance loom) are misnomers. It's the shafts that rise or fall, not the shed.
Wrapping up
I wove a placemat upside-down, and a table runner right-side-up. I folded over and sewed the hems of the placemat, and finished the runner with twisted fringe. They're both reversible. Also, the color of the placemat looks brighter because it is brighter...it's not your monitor settings! I use different shades of blue wool for the weft of each project.


Having woven a full project with both of those drafts, I finished off my warp with an experimental twist. I repeated a small section of the draft partway through, sort of doubling it up to make a twin-diamond pattern. This runner ended up longer than the previous one. Unfortunately I don't have a picture of the finished project, because I gave it away almost as soon as it was done.

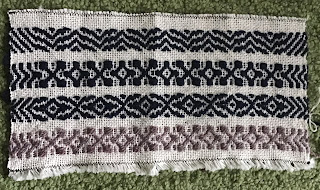
With only a small section of usable warp remaining, I played around making a sampler of narrow border patterns. This sampler does a great job of showing that it's really a plainweave background, with patterns superimposed.

Comments
Post a Comment